Zotero is a free cross-platform research (journal articles, web pages, etc.) management tool. Click here to learn more if you're unfamiliar with how it works.
Zotero comes with a built-in file sync function which enables users to sync their Zotero libraries across platforms (such as iOS, android, Windows, etc.). Unfortunately, their "free" tier of sync service has a limit of 300Mb which can quickly get filled up if you archive lots of papers like myself. Lucky for us, Zotero comes with WebDAV support which can be utilized in place of their storage service. Most people including myself don't have a personal webDAV server; however, Box.net has a free tier of service with 5Gb of space that includes WebDAV support. Below are my sample settings to show you how to set this up for yourself.
First navigate to the preferences menu and select the sync tab.
Under the "Zotero Sync Server" section, enter your Zotero sync service username and password. Check off "sync full-context"
Under "File Syncing" ensure that you check off the box for "Sync attachment files in My Library using" then select WebDAV.
In the same section, for url select https:// from the dropdown and enter dav.box.com/dav in the adjacent textbox.
Finally, in the same section enter your Box.net username and password.
Click verify server to ensure the box sync is properly working. Assuming all goes well, you'll now be able to store 5Gb of content for free.
Recently, I have been following the apple battery throttling scandal that started with a Reddit post and subsequently a formal analysis by GeekBench author John Poole which led me to wonder if the poor performance I've experienced on my iPhone 6 since last year could be related to it. My iPhone 6 was purchased in December 2014 and has been my workhorse for over three years. I never felt the need to upgrade until recently due to it offering all the features I use on a daily basis including Apple Pay, a decent camera, and common tasks such as email and messages. Not much has changed regarding features that I desire; however, one critical thing that began to bother me and compel me to upgrade was the consistent lag on the device. Once seamless tasks such as opening Mail or responding to multiple message chains on Messages while browsing the web slowed to a crawl within the past six months.
Fast forward to the December 2017 revelation of what some on Twitter are calling #ThrottleGate which subsequently led to Apple issuing a formal response; I decided to take matters into my own hands. I had already replaced the screen on my device earlier in 2017 due to an accidental fall out of my pocket, and therefore, I wouldn't be eligible for the discounted $29 apple battery replacement. I went for the next best option. After some research on Reddit and various other internet sources, IFixIt.com seemed to have a reputation for offering close to OEM standard battery replacements for iPhones.
Pre-Replacement Capacity and Benchmark
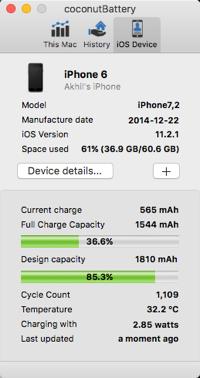
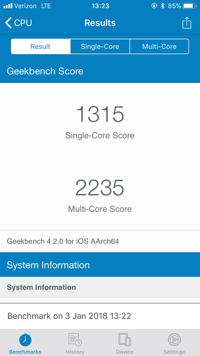
The battery I ordered was delivered within seven days, and I began the process of preparing to replace it. My first step was to analyze data from the original Apple battery using a free tool called coconutBattery. The results (screenshot below) showed that my battery could only deliver roughly 85.3% of its original design capacity and has over 1100 charge cycles recorded. The second step I took was to run the iOS Geekbench CPU benchmark to confirm my suspicions on whether or not my device's CPU (Apple A8) was in-fact being throttled. The results (screenshot below) showed a single core score of 1315 and a multi-core score of 2235.
Post-Replacement Capacity and Benchmark
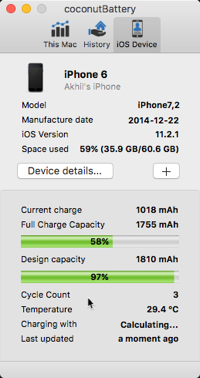
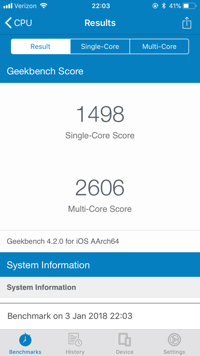
Using the iFixIt guide I was able to replace the battery within roughly an hour. I found the most difficult part of the repair to be aligning the new battery connector likec the OEM battery. The replacement battery comes in an "unfolded" state and therefore, I would suggest prior to placing the battery onto the adhesive in the case, manipulating the battery cable into a folded state similar to the OEM battery- this will make your installation easier. After the phone booted up, I re-ran the Geekbench iOS benchmark and tested the battery using coconutBattery as I did prior. The geekbench results showed a single core score of 1498 (~13.9% improvement) and a multi-core score of 2606 (~16.5% improvement).
Conclusion
After two days of continuous use of the iPhone 6 with the new battery, I am happy to report that my phone is back to the level of operating performance I experienced when I originally purchased the phone. I no longer experience stuttering or user interface latency when I am multitasking or even doing simple tasks such as responding to text messages. If you have an iPhone 6S or below and are considering purchasing a new phone due to lag, I would highly suggest investigating the state of your battery before doing so. It may save you a few dollars and allow you to hold out a bit longer before upgrading.
OMV (openmediavault) is an open source NAS operating system based on Debian. If you're not familiar with it, head here and check it out.
This tutorial assumes basic knowledge of Linux and root access to your OMV server. Lets get started.
Installing OpenVPN (as root)
apt-get install openvpn
After installing OpenVPN, you'll want to obtain the VPN certificate files. These should be provided to you by your VPN provider. My personal recommendation is PIA. If you choose to utilize PIA, you can download the necessary files here.
At this point you'll want to transfer the certificate files over to your server either using SCP or some other mechanism. I personally recommend directly downloading it on the server with wget and then unzipping it with unzip.
From your extracted files, move ca.crt, crl.pem, vpn.ovpn to /etc/openvpn/ (Note: vpn.ovpn refers to whatever VPN server you're looking to connect to)
edit the vpn.ovpn file using whatever editor you prefer and replace the line
auth-user-pass
with
auth-user-pass login.txt
Save and close the file.
Next, create login.txt in /etc/openvpn and place your username on the first line, and your password on the second line. These should be provided to you by your VPN provider.
Username
Password
Now change the extension of vpn.ovpn file to vpn.conf
mv vpn.ovpn vpn.conf
To ensure that OpenVPN connects to this VPN on start, we must edit the openvpn configuration file. Open /etc/default/openvpn in your editor of choice and add the entry AUTOSTART=vpn where vpn refers to the vpn.conf file in /etc/openvpn/. Adding this entry will allow openvpn to search for this configuration file on start and run it.
Lets test our handywork. Start and run openvpn
openvpn /etc/openvpn/vpn.conf
Now test the connection using
curl -s http://ifconfig.me
You should see a different WAN IP which represents your VPN IP.